


 I will try to explain the issues simply and provide practical solutions that will work for you. Like most things, there is a limit to the Wifi radio signal being received by devices around the home. You will know that the Wifi signal strength is shown by the number of bars on your Wifi icon. All the bars indicates excellent Wifi strength, no bars mean, well I think if you are reading this you know what that means.
 Clearly the further your device is away from your Wifi Router the less signal strength you will receive. So how do you fix this so your home has better Wifi signal and fewer 'dead spots'?
I will assume that you have heard of Wifi extenders or Wifi repeaters. Go to any Office Works store and you will find plenty of them. You will also find Ethernet Power Adapters that can provide a virtual Ethernet cable connection using your home electrical wiring. From my experience these solution rarely are very effective. If you have one of these solutions and it is working ok well that's fine.
Here are my best solutions to fix Wifi signal issues.
1/ Relocate your router to a central location within the home to provide a better signal to all areas.
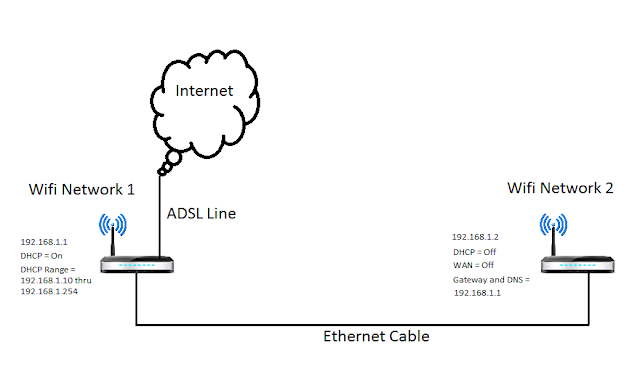
2/ Install your Wifi Router at one end of the house and then add another Wifi Router at the other end.
Tip - These days many people have an old Wifi Router collecting dust somewhere. These will work perfectly as a second Wifi Router.
Terminology -
IP address - A numerical 4 part number displayed as xxx.xxx.xxx.xxx
Subnet Mask - A numerical 4 part number displayed as nnn.nnn.nnn.nnn to determine the number of addresses within the Local Network.
Gateway - A IP address of the Router that is the way out of the Local Network.
DNS - The Internet directory that stores all Internet Names and associated IP addresses.
DHCP - The system that automatically allocates IP addresses to devices when they connect to the Local Network.
DHCP Range - The pool of addresses the DHCP server can allocate from.
Any good electrician can help you relocate your router or install a new Ethernet cable but very few will know how to configure multiple Wifi Routers on a home Local Area Network. So, have your electrician install the Ethernet cable and setup your additional Router yourself.
So this is what you have to do to add an additional Wifi Router/s on your network.
A/ Existing Router - Change the DHCP range to free up some addresses for the additional Router/s.
B/ Additional Router/s - Enter an IP address to the additional Router/s that was made available in the previous step. Disable WAN connection, Disable DHCP, add the Gateway and DNS IP's as the existing Router IP Address. Define a Wifi name/s and password/s on the additional Router/s.
C/ Connect an Ethernet cable from the existing Router LAN port to the additional Router LAN port.
D/ Setup both Wifi networks on your mobile devices, use the Wifi network that is closer to you for best speed and reliability.
How to do this you ask?
1/ Open a command prompt on a pc connected to your existing router. Use the CMD command.
2/ Type IPCONFIG/ALL
3/ Look for your Gateway IP address. Typically it is either 192.168.1.1 or 10.1.1.1
4/ Open a browser and enter your gateway IP
5/ Your existing Router login page should be displayed. Login with its usercode and password.
6/ Go to the LAN section, you will see the Router IP and Subnet mask there. Typically the Mask will be 255.255.255.0 (This defines the number of Network IP addresses) Look for the DHCP range. Typically it will be either 192.168.1.2 to 192.168.1.254 or 10.1.1.2 to 10.1.1.254 depending on your LAN IP addresses.
7/ Change the starting IP that will be allocated to devices to allow room for the additional Routers. Eg. DHCP Range 192.168.1.10 to 192.168.1.254. This will allow us to allocate up to eight additional routers. (IP's *.2 *.3 *.4 ... *.9). Devices will be allocated addresses *.10 thru *.254. I doubt you will have more than 200 devices at home :).
8/ Save your changes and re-confirm your changes are correct and saved.
9/ Disconnect your PC from the existing Router (Wifi or Ethernet Cable) and connect your PC to the additional Router either via an Ethernet Cable or Wifi.
10/ If you dont know the Wifi password for the additional Router, you will need to use a cable.
11/ Ensure you are connected and open a browser and enter the additional Router IP. Again it typically will be either 192.168.1.1 or 10.1.1.1. Look at the Router label, it usually has the factory default IP details there.
12/ Your additional Router login page should be displayed. Login with its usercode and password.
13/ Go to the WAN section and disable WAN connections.
14/ Go to the Wireless section and add a new Wifi name and password.
15/ Go to the LAN section and disable DHCP.
16/ Change the additional Router IP to one you made available in step 7. eg. 192.168.1.2, change the gateway IP and DNS IP to the existing Routers' IP. eg. 192.168.1.1. Save your changes.
Note: You will loose your view to the Router once it re-boots as it no-longer has the old IP.
17/ Enter the new additional Router IP in the browser address bar.
18/ Login and check all your changes.
19/ Remove the Ethernet cable from your PC and connect it to your existing Router LAN port.
20/ Connect to the additional Router Wifi network (as per Step 14) and test you have access to the Internet.
21/ If this is working, you can relocate the additional Router to the other end of your house where poor Wifi signal exists. You may need help to have an Ethernet cable installed between the old and new Router locations. Cat5e or Cat6 will work just fine for a home network.
Tip - You can use any address for the additional Router but it MUST be within the LAN IP Range and MUST NOT be within the DHCP Range. IP conflicts may occur if you get this wrong. Be aware of any static IP usage. Look in the Port Forwarding section of your Router to see if anyone has setup a specific IP for external access. These static IP's are for devices that do NOT use DHCP. These static IP's must NOT be within the DHCP range. This instruction is suitable for most home and small office networks with less than 250 devices.
Need help? Send me an email, tell me your problem and I will try to help you out.
Call Geoff on 0431 232 796 or email Geoff@EppingElectrical.com
